How To Dye Easter Eggs
You will need:
A dozen eggs
Either one packet of Easter Egg Dye -or- The skins from 15 yellow onions.
Vinegar
Some old pantyhose (clean)
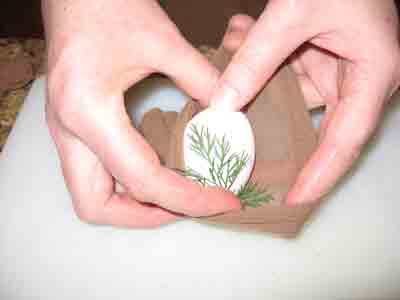
Some small leaves
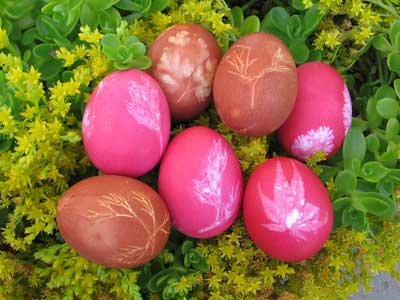
I used (starting at the top and going clockwise) cilantro, parsley, bamboo, geranium, japanese maple, and dill. In the very center are a couple of vetch leaves. I had the best luck with cilantro and dill. The japanese maple and vetch were pretty good too.

If you are using a packet of purchased dye, start by hard boiling your eggs. My packet says, “Boil the desired eggs and let them cold.”
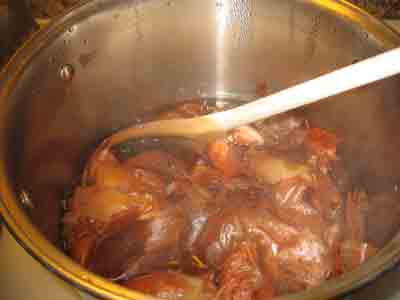
If you are making onion skin dye, start by boiling the onion skins with 4-6 cups of water and a few tablespoons of vinegar for at least half an hour. Then cool to room temperature and strain. Here’s a link to the dye recipe I used: How To Dye Red Eggs with Onion Skins for Greek Easter. When I told Zoe I wanted to dye Easter eggs using onion skins, she yelled, “What is this, the fifteenth century?” Apparently Mama uses the commercial dye.
Tie a knot in a pantyhose leg, then cut about 6 inches from the knot. If you’re at the foot of the pantyhose, you don’t need to make a knot, just cut about 6 inches from the toe.
Dear Mama,
Today I took a pair of scissors and cut up all your pantyhose.
I’m very sorry.
Love,
Lulu

Tuck an egg (boiled if using dye packet, raw if using onion skins) and a couple of leaves into the pantyhose segment. Try to get the leaves nicely fanned out. And don’t put too many leaves, just a couple of small ones, because you want most of the egg to be red. Zoe kept telling me this and I didn’t listen, but she was right!
Twist the open end of the nylon so that the egg and leaves are tightly enclosed, then tie off the end. When you do this the leaves will shift around and end up in a blob, so you’ll have to reopen the nylon and poke the leaves around. Then this will happen again. And again. And again. Ti na kanoume?
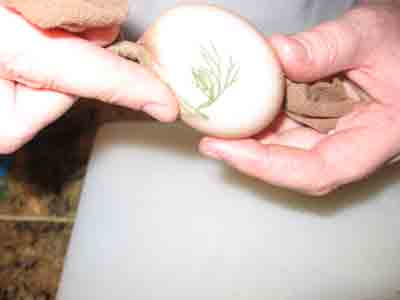
Here they are, all tied up:
If you are using the onion skin dye, put it in a pot and add the eggs. They should be in single layer, covered completely by the dye. Bring to a boil and boil for 10 minutes. Some people say to boil them longer, but I like the eggs to still be edible afterwards! When the 10 minutes are up, turn off the heat and let the eggs cool in the dye. I actually let them soak in the dye overnight, and as you’ll see, they got plenty of color without longer boiling.
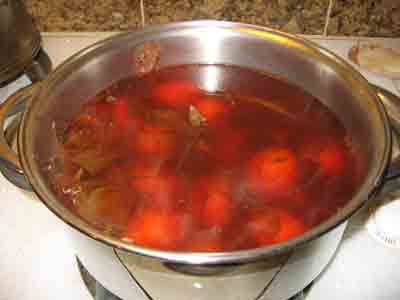
If you are using a dye packet, follow the directions at this point. Don’t forget to add the vinegar like I did, because your eggs will barely even turn light pink. I thought there was something wrong with the dye, then I remembered the vinegar and added it. Whomp! Red eggs! Note that the dye only takes “2-5 minutes the maximum.”

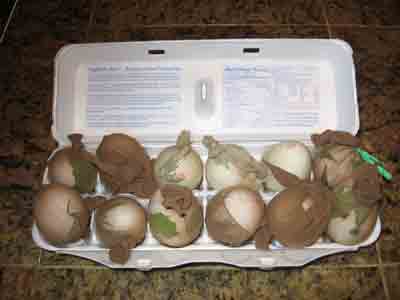
Whichever method you’re using, when the dyeing period is over, fish the eggs out of the liquid and dry on paper towels, then unwrap. A lot of mine had blobby unattractive leaf prints, but I still thought they were beautiful! Here’s a shot of the best of them. The brown ones were colored with onion skins and the red ones with a dye packet.
Comment by Ivy
Lulu, your eggs look beautiful. I haven’t done this for many years now. You can also dye your eggs after boiling spinach and have some green eggs as well and beetroots for red ones. I think you forgot the last touch. Wet a piece of cotton wool with olive oil and then shine the eggs. They will look even better.
Comment by maria verivaki
absolutely beautiful lulu
Comment by lulu
Ivy, I did forget the oil! Oh, well, there’s always next year. Next time I would like to experiment more with natural dyes, because yesterday when I peeled one of the red ones to eat, the dye had gone through and stained the eggwhite pink, which kind of grossed me out.
Comment by lulu
Thanks, Maria! Yours are even better! I wasn’t patient enough with positioning the leaves, but next year I’ll do better.
Comment by Funky Grampa
I love it. Long live the reality of Creation and Nature’s way. I’m glad you cut up all Mama’s panty hose afer her rant about commercial dyes.
Comment by lulu
Hi Funky Grandpa. I don’t know what Mama was thinking leaving her panty hose unguarded!
Comment by Laurie Constantino
You are so funny!!!
Comment by lulu
Laurie,
Comment by Diana
These are fantastic! I am going to try and get some done tomorrow for the kids on Sunday…perhaps bring some to my Thea and my cousin & his wife. Going to show the kids the Greek game of egg butting lol. Now to hunt down those panty hose!
Comment by lulu
Hi Diana, thanks for visiting! Good luck finding somebody else’s pantyhose to cut up!
Pingback by How To Naturally Dye Easter Eggs | Eating Out Loud
[…] How to Dye Easter Eggs – Mama’s Taverna […]
Comment by Japanese cooking recipes
This looks great! I love it.
Comment by Jacqueline
Your eggs are beautiful! They inspired me! last night, I found my self w/5 dozen eggs, easter is in 2 days & No Red Egg DYE!
Time: Friday 8:50pm. nearest ‘Mediterranean’ store: 30 minutes away (closes in 10 minutes) Gas tank: A big fat ‘E’
Blessed at birth with 15th centurion love for natural solutions, experimenting, & making things(mostly messes), the trials began!
8 eggs, skins of 3 very large yellow onions + 1 healthy GLUG of white vinegar. boil/soak for 4 hours.
They all came out brown…’onion skin brown’…they look like really really smooth onions.
I am not sure why I expected red…But they sure taste good!
Christos Anesti
Comment by paul
thanks a lot, this is great and I love it 😉
Comment by ces
Lovely!!! Very brilliant idea. Thanks
Comment by NIKOLAI MASSENKOFF
Thank you very much, lots of fun and information, smiling, giggling, enjoying your delightful hints. Christos Anesti.
Nikolai
Choir Director
St. John’s Russian Orthodox, Berkeley, CA
http://www.nikolaimassenkoff.us